Getting a “Connection Refused” error while trying to connect to your website using SSH? This is one of the most common issues that arises when using a program like PuTTY to access your web server.
Not to worry! While it might seem overwhelming, it’s easy to fix this issue yourself. You just need to run a few tests and try a few different settings.
In this short article, we’ll briefly talk about what SSH is. Then, we’ll examine the SSH “Connection Refused” error and see what can cause it.
Finally, we’ll show you how to solve it!
If you want to jump straight to the solutions, click here.
- What Is SSH?
- What Is the SSH “Connection Refused” Error?
- How to Fix the SSH “Connection Refused” Error
- 1. Check Your Network Connection
- 2. Double-Check Your Credentials
- 3. Reboot Your Server
- 4. Make Sure SSH Is Installed
- 5. Make Sure SSH Is Working Properly
- 6. Ports and Firewalls
- 7. Contact Your Host
- Conclusion
What Is SSH?

Before we dive into solving this issue, let’s briefly review what SSH is. Secure Shell (SSH) is a network protocol that is used to access a web server.
In short, it allows you to connect to your website using secure encryption, even over an unsecured network.
SSH is often compared with FTP/SFTP, which is also a way to connect to your website. FTP (File Transfer Protocol) is used to transfer files between computers via a TCP/IP network.
The main issue with FTP is that it is unencrypted. A bad actor can hijack your connection and manipulate files on your server.
To solve this, SFTP was invented. SFTP, which stands for either Secure File Transfer Protocol or SSH File Transfer Protocol, works in a similar fashion as regular FTP. However, it does this over a secure connection, rather than an unencrypted one.
To make your connection secure, SFTP uses SSH, which is a much broader technology. SFTP thus runs “on top of” SSH.
While FTP/SFTP is limited to file management, SSH allows you to do a number of other tasks.
These include…
- Remote command-line. If you want to use a Command Line Interface (CLI) instead of the default GUI, you can do so with SSH. In fact, you can even activate your Astra license via the command line!
- Login. Locked out of your WordPress site? You can actually use SSH to log in.
- Remote command execution. Want to execute commands on your server remotely? Not a problem with SSH.
- Use developer tools for WordPress. These include WP-CLI, Git version control, and package managers for PHP and JavaScript, just to name a few.
- Remove damaged or hacked files. If your site has been hacked, you can use SSH to view any recently modified files and see if they contain malicious code.
Ultimately, FTP/SFTP is a way of transferring and managing files to/from a server, while SSH is a secure protocol for accessing your server.
What’s PuTTY?

Chances are, if you’re trying to access your site via SSH, you’re using PuTTY, the most popular SSH client.
PuTTy installs on your local computer and connects securely to the SSH daemon on your web hosting server. All traffic sent between the two is encrypted and safe from prying eyes.
While PuTTY is the most popular SSH client, there are other options available.
What Is the SSH “Connection Refused” Error?
If you’re trying to use SSH, the “connection refused” error is one of the most common ones that you’ll have to deal with. But what does it mean?
Connect refused means exactly what it says. It means the connection couldn’t complete properly or the login details you’re using are not correct.
There are a few different potential causes of this error. Let’s briefly go through each one.
- There’s a problem with your network. If your network is having issues with performance, then SSH will probably be affected too.
- The credentials are wrong. If your host name, username, password, or port are incorrect, SSH will not connect.
- SSH is not installed. While SSH usually comes pre-installed on web hosts, some dedicated hosting plans require you to manually install it.
- SSH is down. There are a few reasons why SSH might be down, including a DDoS attack or too much traffic.
- Firewalls are preventing access. It is common for universities, corporate offices, and schools to block traffic on port 22, which is the port used for SSH.
How to Fix the SSH “Connection Refused” Error
Now, let’s walk through 7 different solutions to fix the SSH “Connection Refused” Error. If you aren’t sure which of them is most likely to work, start at the top and work your way down.
- Check Your Network Connection
- Double-Check Your Credentials
- Reboot Your Server
- Make Sure SSH Is Installed
- Make Sure SSH Is Working Properly
- Ports and Firewalls
- Contact Your Host
1. Check Your Network Connection
While this may seem obvious, it doesn’t hurt to check! Is your network connection working well? Are you able to visit other web pages without any issues? Is your website loading correctly?
Make sure everything works as expected.
Solution
If it isn’t, there are a few things you can try. Reboot your router and/or computer. If possible, test the connection via a different network location. Using the tethered Internet connection from your phone is a quick way to do this.
Finally, see if other web services like SFTP are working.
2. Double-Check Your Credentials
Connection working fine? What about your login credentials? Using the wrong credentials is the most common reason why your connection isn’t working.
Solution
There are a number of things you’ll need to ensure are accurate:
Host Name
The Host Name is your complete domain name (Fully-Qualified Domain Name or FQDN) or your IP address. Not sure what your IP is? Use this nifty tool.
Username
For username, you’ll need to input your FTP/SFTP username. Typically, this can be found inside your web hosting panel and/or in an email sent from your host when you purchased the plan.
Here are links to some common hosts:
- SiteGround – How to create, edit, and delete FTP accounts
- BlueHost – How to Create an FTP account
- GreenGeeks – Getting Started: Setting Up FTP Accounts in cPanel
Password
Likewise, this is the password for your FTP/SFTP account. If you can’t find it, look in your hosting panel.
3. Reboot Your Server
Are you on a dedicated server? Or maybe you physically own your server?
Solution
Try rebooting your server. This can often fix connectivity issues. Just make sure rebooting won’t impact visitors if you’re running your website from it!
4. Make Sure SSH Is Installed
For SSH to work, it needs to have a program called a daemon installed on the server for PuTTY to connect to. This is a tiny program that listens for incoming connections and then accepts them, if the credentials are correct.
Virtually all servers will have this daemon installed, especially if you are using a managed WordPress host. However, if you are using a dedicated host, you may need to install it yourself.
Solution
The exact installation process will depend on your host and server. If you want to install it manually on a Linux Ubuntu server, you’ll need to use OpenSSH.
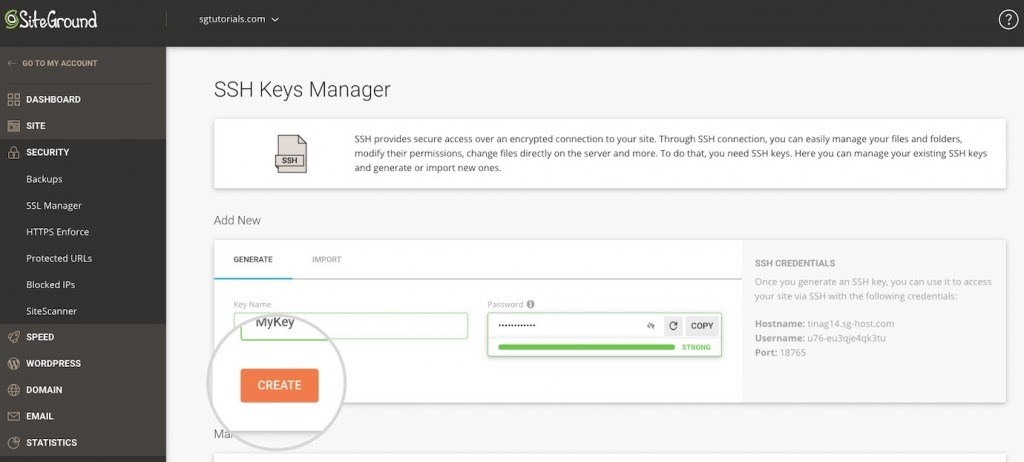
If you are a SiteGround user, you can easily enable SSH by going to Site Tools > Devs > SSH Keys Manager.

Once there, enter a key name and generate a random password, then press Create.
Be sure to write down these credentials, as you’ll need them to access your site in PuTTY. You can read the entire tutorial on SiteGround’s website.
In cPanel, you’ll need to go to Advanced > SSH/Shell Access, enter the required information, and click Generate.
Other hosts have similar processes for adding SSH keys.
5. Make Sure SSH Is Working Properly
As mentioned above, you’ll need to have a daemon installed to connect via SSH. If it is not working, you won’t be able to access your server.
There are many reasons why the daemon might be unresponsive, such as hosting problems, DDoS attacks, or a large amount of traffic.
Solution
To check if your daemon is running, you’ll need to enter a command into PuTTY. Which one? It depends on your server and the particular Linux installation that it’s using. Linux is the most popular operating system for web hosting providers.
Note that this isn’t your personal computer, but the server of your website that you are connecting to.
| Distribution | Command |
| systemd systems (Arch, Ubuntu 16.04+, Debian 8+, CentOS 7+, etc) | sudo systemctl status sshd -l |
| CentOS 6 | sudo service sshd status |
| Ubuntu 14.04, Debian 7 | sudo service ssh status |
If you get an error message, then it is likely that you’ve found the source of the issue. Potential fixes include:
- Verify that your hostname is spelled correctly
- Use the ping command to verify that you can resolve the hostname on your client computer (the one you are trying to connect from)
- Checking firewall status and blocked ports
- Restarting your daemon
The links below go into more detail than we can provide here:
- How to Troubleshoot SSH Connectivity Issues – DigitalOcean
- Troubleshooting SSH – Linode
- SSH Tutorials – SiteGround
- SSH Access – Bluehost
6. Ports and Firewalls
If you’re logged in from a university, corporate campus, or other large organization, it’s very possible that a firewall is blocking port 22.

Solution
To see if it is, use this tool. Simply add your domain, make sure 22 is listed as the port, and press Check.
If the connection test is successful, it means that the issue is with your computer or connection and not with the port. Check the firewall rules or get in touch with the system administrator for your network.
7. Contact Your Host
Still having issues? It’s time to contact your host! It’s likely that they can help you.
Or it might be a totally different error like “ERR_CONNECTION_REFUSED” So you have to check this possibility as well.
Conclusion
SSH is a powerful technology and learning how to use it is well worth your time. It allows you to access your site securely, manage files, run processes, and do a number of other useful tasks.
Hopefully, you’ve resolved the “Connection Refused” error using this guide. While this problem can seem bewildering, it’s not too difficult to fix. You just need to run some of the tests that we mentioned above.
Recommended Articles:
Experienced the “Connection Refused” error yourself? What solution did you use? Share it in the comments to help us and other readers!


