In this post, we’re going to be taking an in-depth look at Comet Cache, a caching plugin for WordPress. Providing a full Comet Cache review.
We’ll be exploring what features the plugin offers, how to set it up optimally for your website, and more.
Let’s get going!
What Is Comet Cache Again?
Comet Cache is a popular caching plugin for WordPress, initially launched in 2016 it now boasts over 50,000+ active installs.
With an advanced feature set including WP-CLI compatibility, Comet Cache can look like a daunting prospect to new users. However, it’s easier to use than it first seems.
Although not as user-friendly as similar caching plugins such as WP Rocket, can Comet Cache compete in other areas?
Comet Cache in Action
What use is a caching plugin if it makes your site slower or doesn’t improve the performance of your WordPress website. That’s why rather than ramble on, we decided to put the Comet Cache plugin to the test.
A bit about the test website. It’s set up using PHP 7.3 on a Linode server with WordPress 5.3 along with the latest version of Comet Cache.
The theme I’m using for these tests is our very own Astra, a blazingly fast lightweight WordPress theme. And I’m also using one of our website templates allowing you to build a full site in minutes.
Let’s take a look at the results.
Without Comet Cache
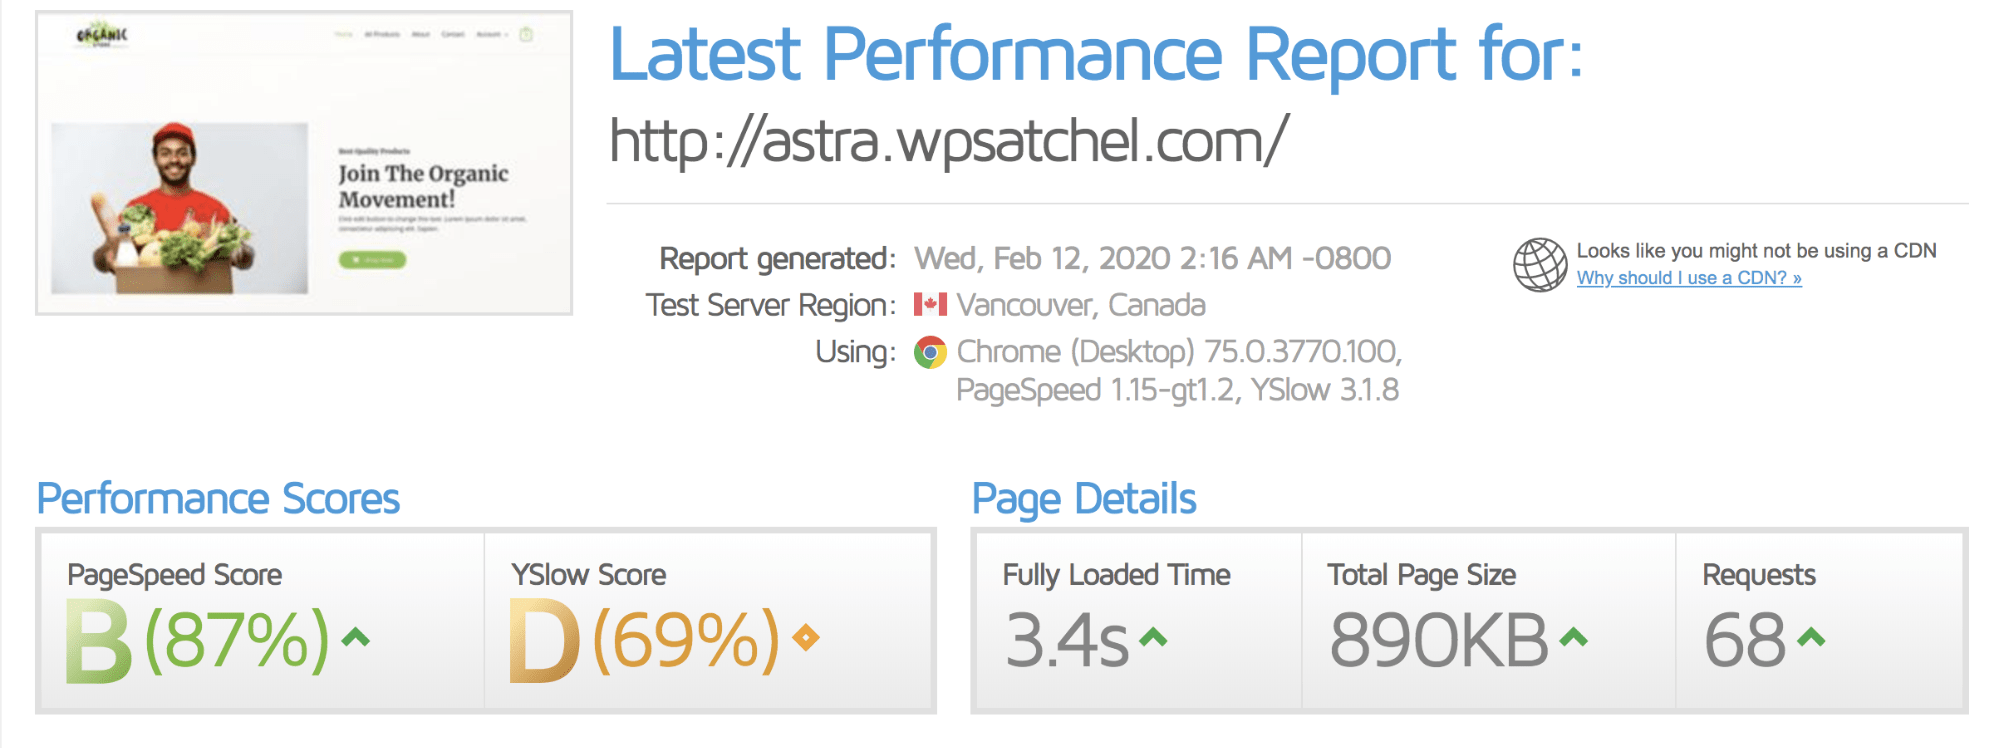
A fully loaded page time of 3.4 seconds, a total page size of 890KB, and 68-page requests. Not bad sure, but pretty sure we can do better than that.
Let’s see where installing and configuring the Comet Cache plugin takes us.
With Comet Cache
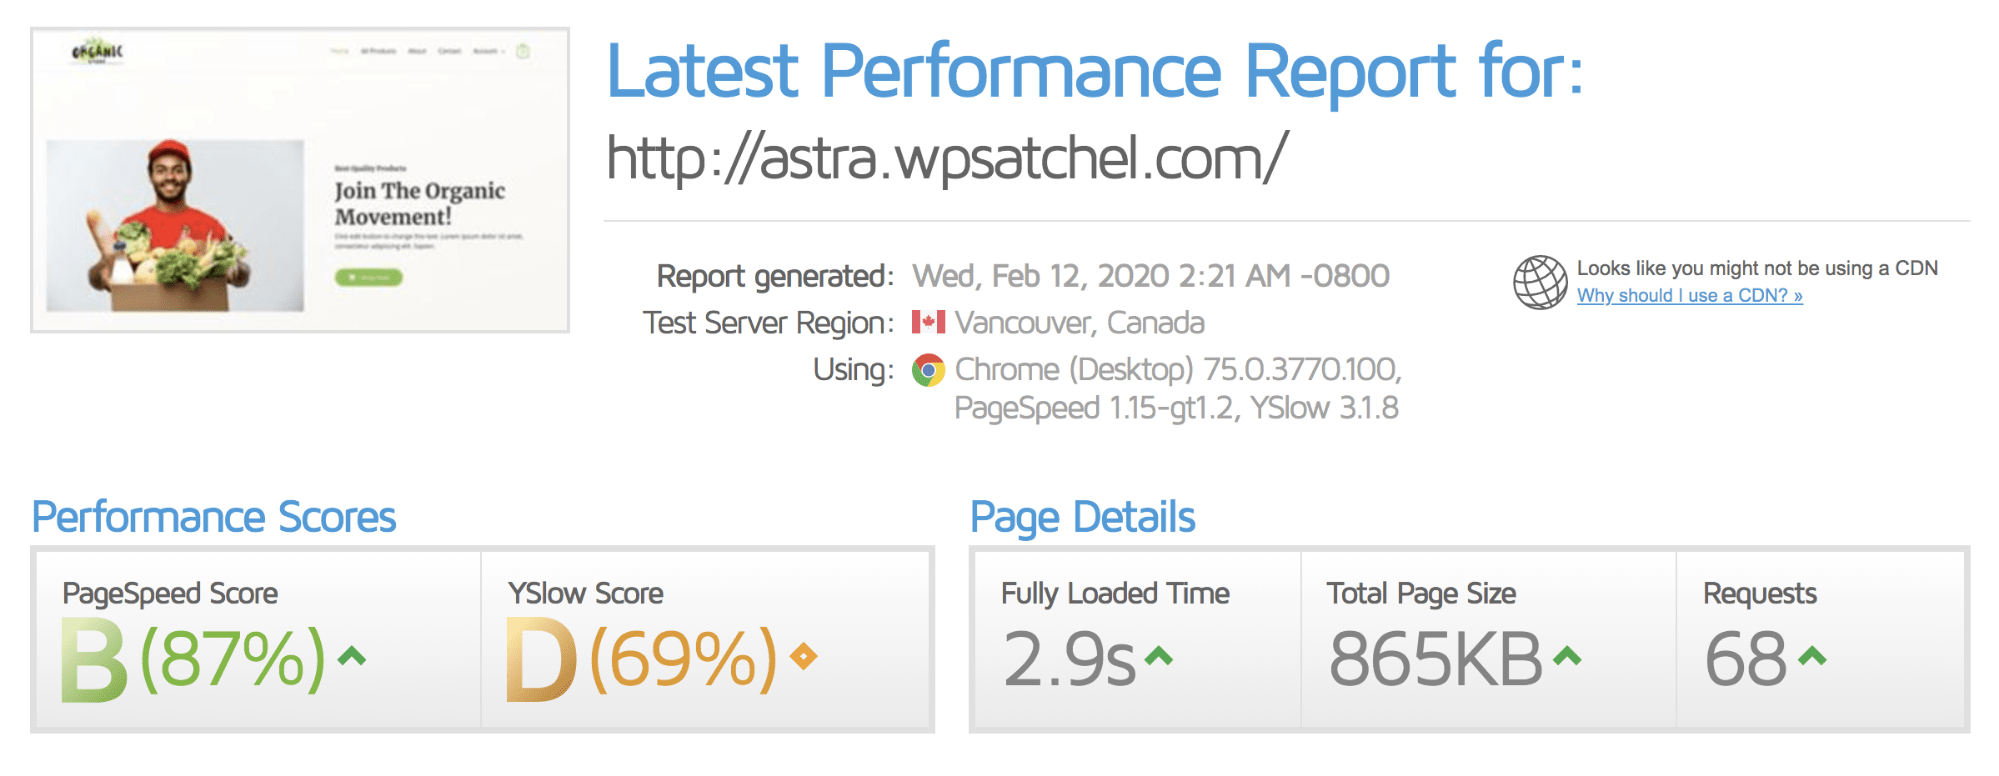
Quite the improvement! A fully loaded page time of 2.9 seconds, a total page size of 865KB, and 68 requests.
You may be thinking, “Well, why are there still 68 requests?”. And that’s a great question! Because Comet Cache doesn’t include the ability to combine scripts at all. For that, you’ll need to use something like Autoptimize.
We spent no more than 10 minutes configuring Comet Cache to get these results. If you spent a little longer configuring both Comet Cache and Autoptimize, we’re sure you could achieve even better results.
How to Setup Comet Cache
Step 1: Install and Activate the Plugin.
Head on over to your wp-admin > Plugins > Add New and search for “Comet Cache.”
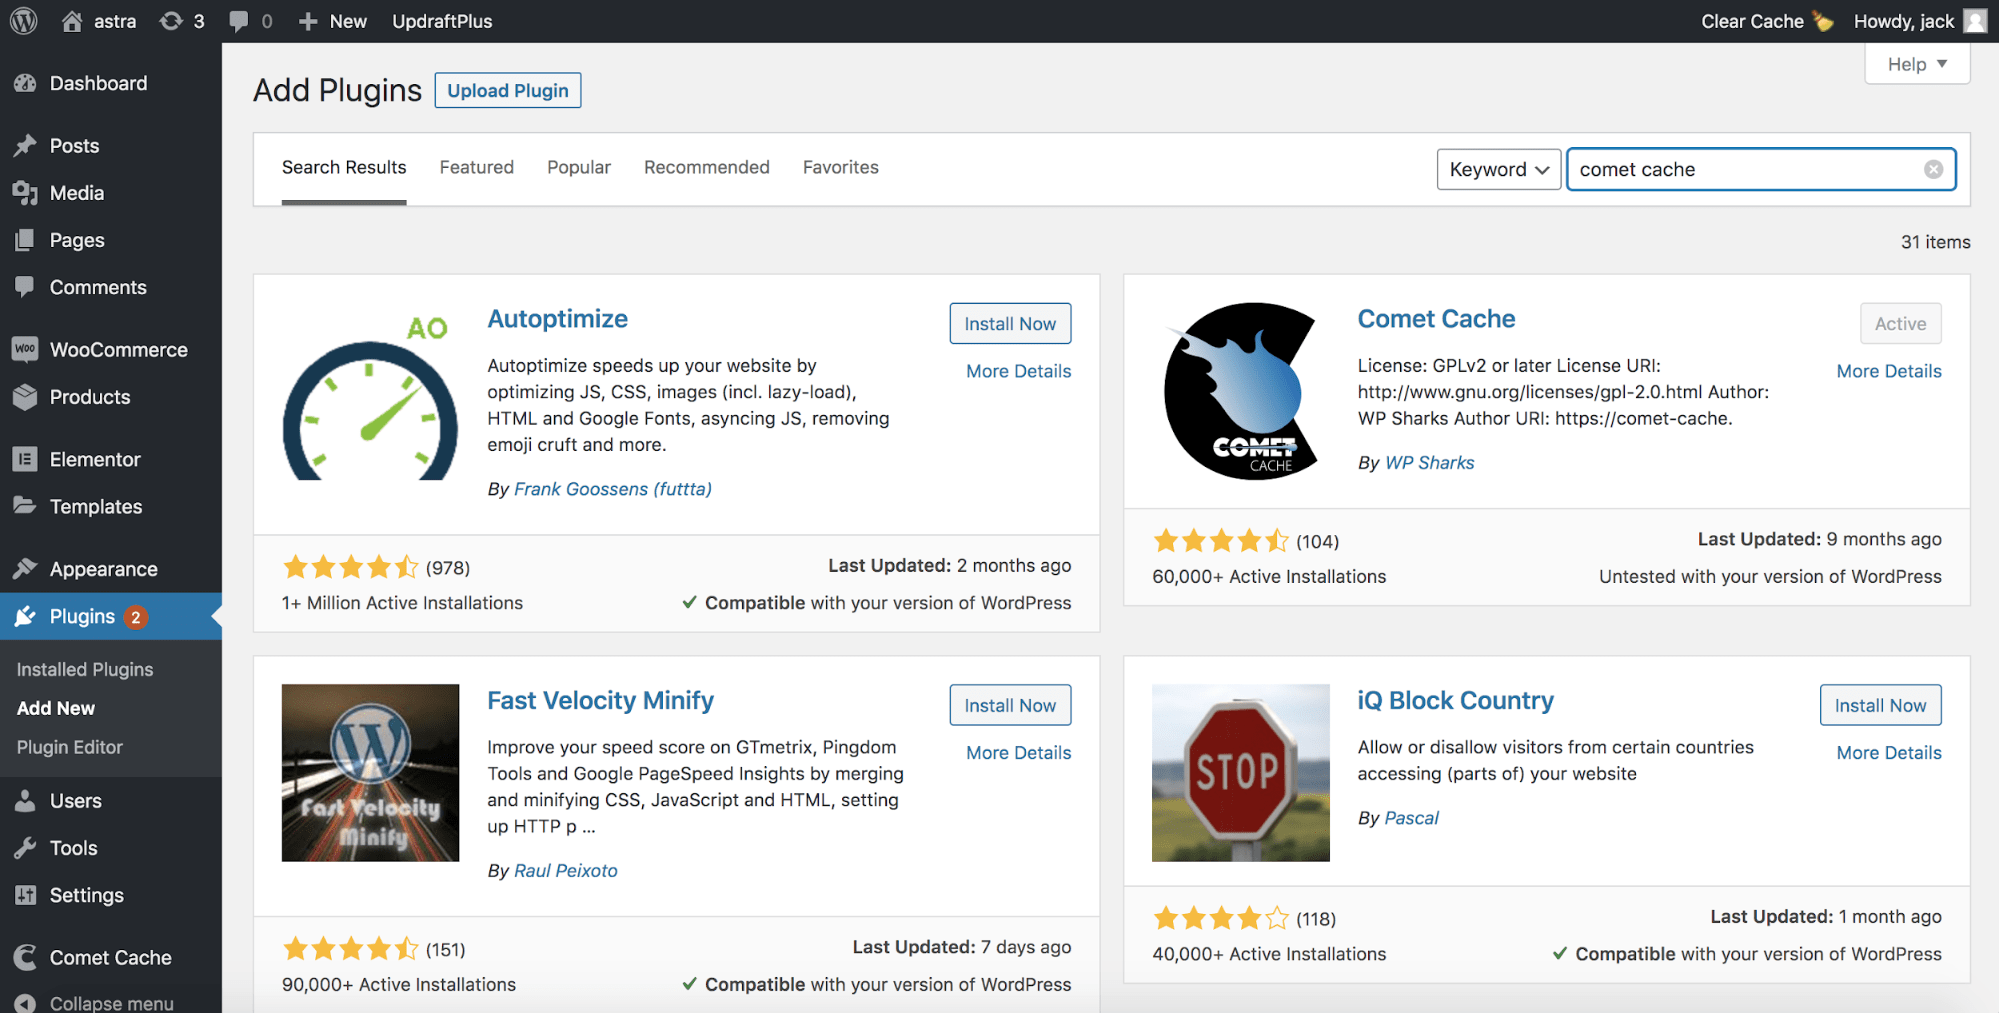
Install the plugin and activate, it’s that simple! 🙂
Step 2: Configure GZip Compression
Out of the box, Comet Cache comes set up with almost everything you need, the caching is automatically enabled, and it is pretty well optimized.
Instead, all you need to do is enable GZip compression. You can do this in your wp-admin > Comet Cache, scroll down to “Apache Optimizations,” and then select “Yes, enable GZip compression.”
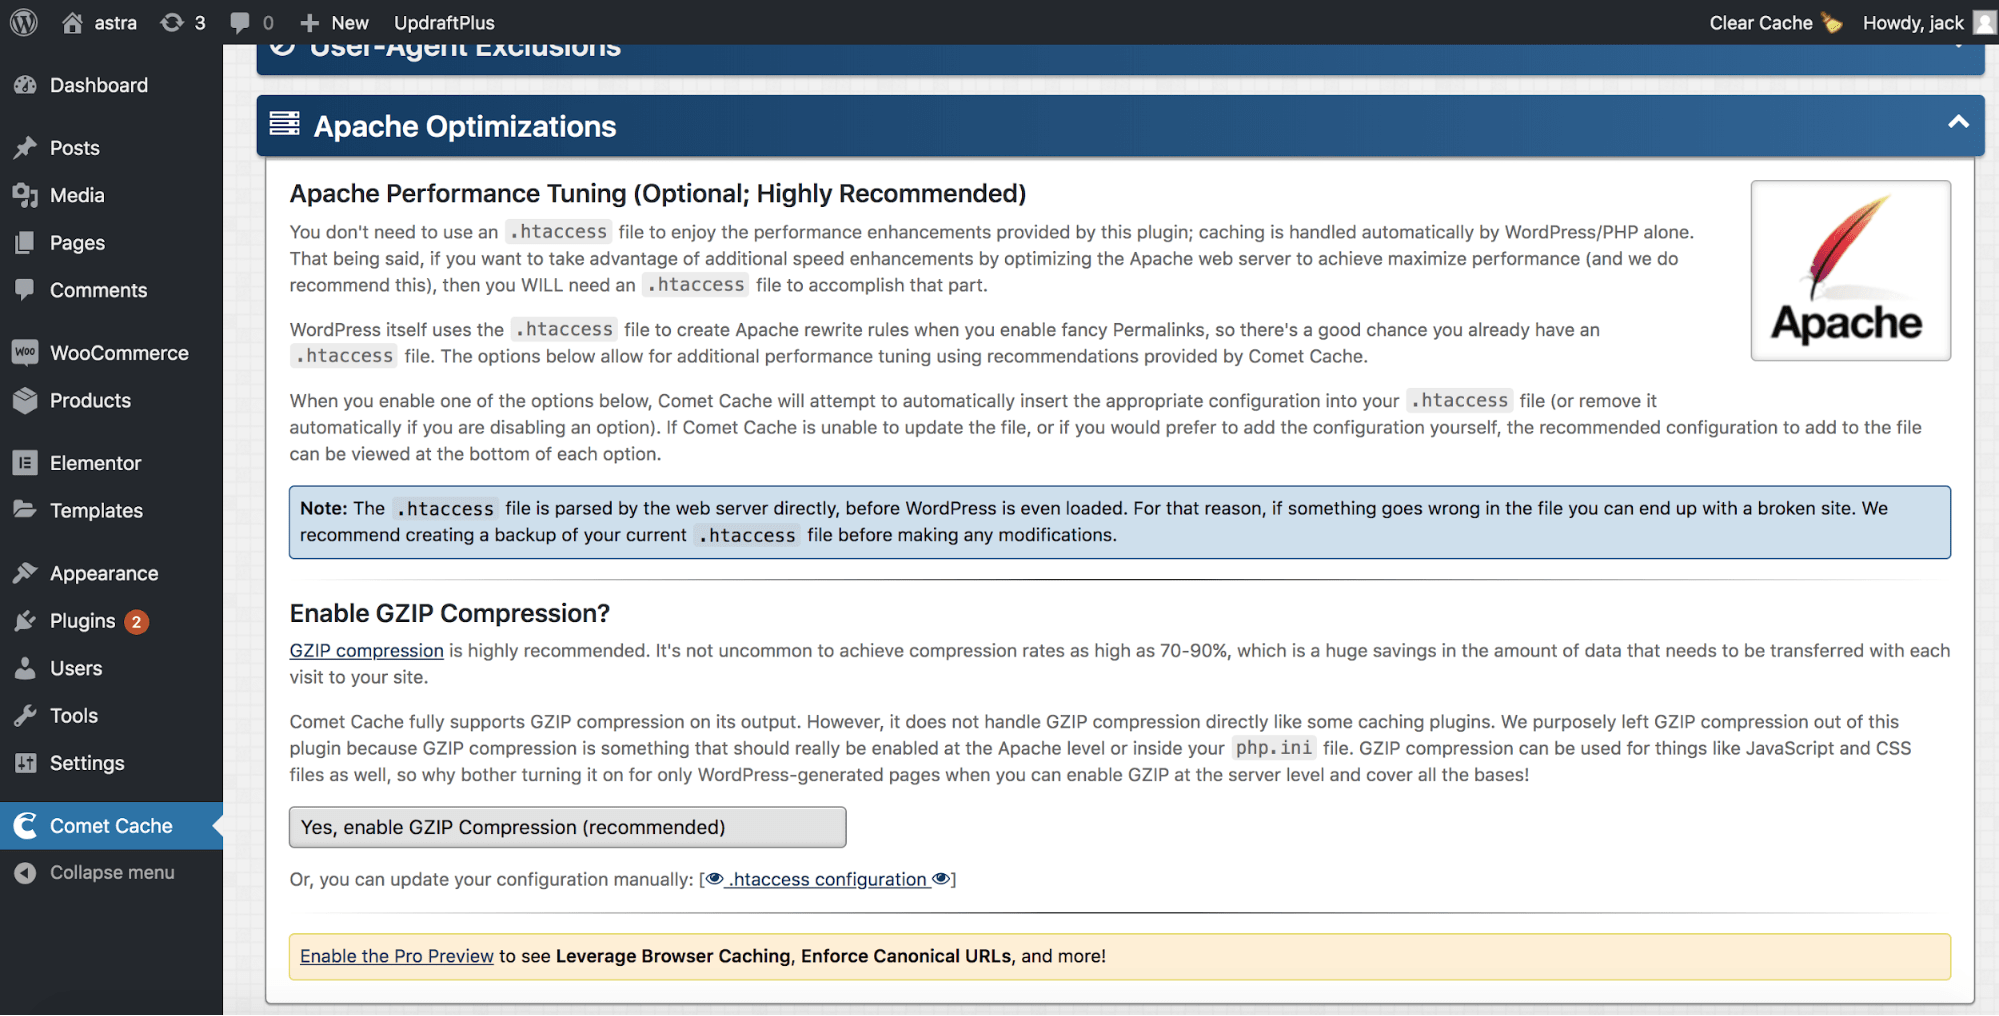
Save your changes at the bottom of the page, and you’re done!
An additional note though, is, as you’ll see from the above screenshot, the interface is text-heavy and not exactly beginner-friendly. If you want a more user-friendly plugin, we recommend WP Rocket (WP Rocket review).
Comet Cache Pricing
Like many plugins available for WordPress, Comet Cache is a freemium plugin. Freemium simply means there’s a free version with a paid upgrade available.
You can download the free version of the Comet Cache plugin from WordPress.org.
The premium version of the Comet Cache plugin is available from the Comet Cache website. It also comes with a name change being called Comet Cache Pro.
The Pro version of Comet Cache is priced as follows:
- Single site license — $39
- 3 site license — $99
- Unlimited site license — $139
The support and renewal process is somewhat different from other WordPress plugins. Most WordPress plugins have an annual renewal fee.
However, in Comet Cache’s case, what you get is lifetime updates of the plugin and support for 3 years from your purchase date.
After your 3 years of support has expired, you can renew support for the following prices:
- $9/year for a single site or 3 sites license.
- $29/year for an unlimited site license.
Yet to add to the pricing confusion, there’s, even more, you have to be aware of.
Using a Multisite license? In that case, you’ll need the unlimited site license. The single site license is for one single install of WordPress standalone and doesn’t include any subsites. While this isn’t super unusual, it certainly adds yet another cost you need to be aware of.
And there’s yet, even more, licensing prices and conditions you need to know! Yes, we know, it’s a lot, right?
There’s the Developer license. You see, if you want to use Comet Cache Pro on your customers’ website, they either need to buy their own Comet Cache Pro license. Or you need to purchase a Comet Cache Pro developer license.
The Developer licensing cost is as follows:
- $249 — Comet Cache Pro 25 site developer license + 5 years of support.
- $495 — Comet Cache Pro 100 site developer license + 5 years of support.
- $895 — Comet Cache Pro Unlimited site developer license + 5 years of support.
- $199 — Comet Cache Pro Unlimited site developer license, annual recurring payment.
Then there’s the refund policy, unlike most other WordPress plugins and themes nowadays, Comet Cache Pro doesn’t offer a money-back guarantee. While they do have a refund policy, it surrounds technical issues with the plugin not working.
Compare that to a plugin like WP Rocket, which offers a 30-day money-back guarantee.
Overall the pricing structure of Comet Cache Pro is rather confusing and unnecessarily involved, in our opinion.
Having a mixture between an unlimited site license and a developer license is quite unusual, most plugins just have an unlimited site license that you’re allowed to use on your clients’ site.
Comet Cache Features
Now you know about the (confusing) pricing structure of Comet Cache, what about the feature set?
Well, you’ll be pleased to know that Comet Cache is featured-packed and comes with a raft of functionality that’ll help you make your WordPress site blazingly fast.
- Post/Page/Tag/Category caching
- Automatic & Intelligent cache clearing (Pro only)
- Client-side browser caching
- RSS, RDF & Atom feed caching
- 404 (Not found) request caching
- Automatic cache expiration time
- URI cache exclusion patterns
- User-Agent exclusion patterns
- HTTP referrer exclusion patterns
- GET request caching & exclusion
- GZip compression
- WP-CLI compatibility
- AC (Advanced Cache) system
- Debugging mode
- Translation compatibility
- Logged-in user caching (Pro only)
- Mobile Adaptive mode (Pro only)
- Leverage Browser Caching (Pro only)
- Enforce Canonical URLs (Pro only)
- Ajax-Powered Clear Cache button (Pro only)
- Auto clear URLs (Pro only)
- Import/Export configuration (Pro only)
- Manually clear specific URL (Pro only)
- Manually clear current page (Pro only)
- Manually clear PHP OPCache (Pro only)
- JS/CSS Concatenation and minification (Pro only)
- Cache Preloading (Pro only)
- CDN integration (Pro only)
As you can see, a lot of functionality, although most of the functionality you really want, is behind a pay-wall.
Let’s take a look at the most important functionality in the Comet Cache plugin that you don’t get in the free version.
JS/CSS Concatenation and Minification
This is vital to running a fast WordPress website. Concatenation is the method of combining multiple scripts of one type into one, thus reducing the number of requests sent to a browser.
Minification, on the other hand, is the method of removing comments and white spaces (formatting) within code files to make them as small as possible.
In Comet Cache, this functionality is restricted to the Pro version only. Although you can use a plugin like Autoptimze to get the same functionality.
Cache Preloading
When you use a cache plugin, the cache isn’t built until an end-user has visited the page, and then the plugin caches it. Meaning that for at least 1 visitor, your site could be slow while the cache is being built.
To prevent this, many popular WordPress Caching plugins offer cache-preloading. How does it work? The plugin crawls your site and builds a cache of all URLs on your website, ensuring it’s fast for each and every visitor.
However, in Comet Cache, this functionality is only available in the Pro version.
Leverage Browser Caching
When you run a speed test, you might see a recommendation that tells you to leverage browser caching.
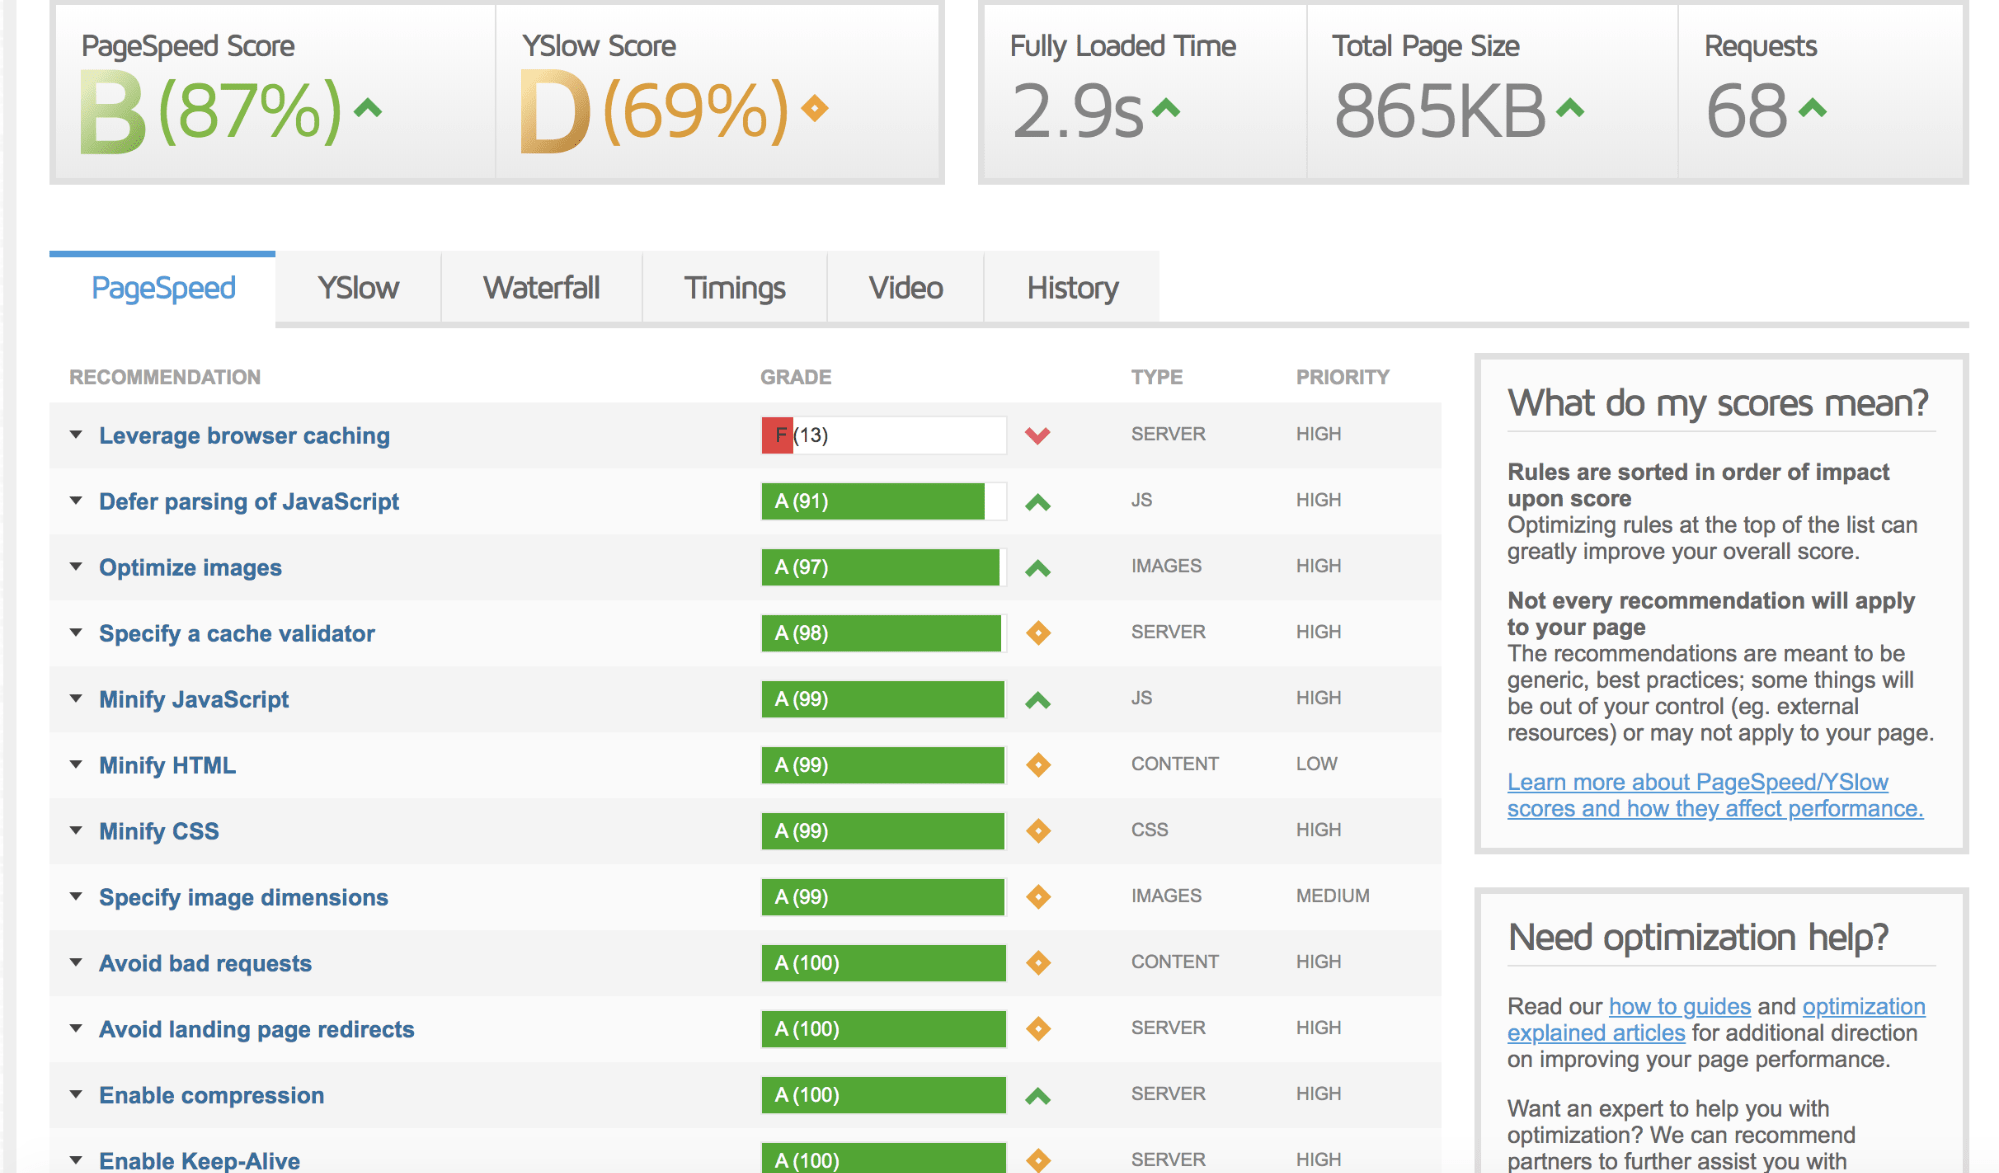
Most of the time, this is why you’d install a caching plugin. By leveraging browser caching, you’re allowing the visitors’ browser to cache the resources needed for the page for a specified time (often a week or so).
This then speeds up the subsequent loading of the website for the visitor and saves them on data costs from having to re-download the resources on each and every visitor.
Yet this functionality is only available in Comet Cache Pro and not in the free version.
What We Like About Comet Cache
The main aspect we like about Comet Cache is how easy it is to set up. You can literally have it up and running in less than 5 minutes for a pretty standard configuration.
Although the user interface isn’t the prettiest or easy to use, the setup process isn’t complex.
What We Aren’t so Keen on About Comet Cache
The pricing structure is somewhat complicated, and even though the pricing does offer value for money, actually finding which license you need feels like an unnecessary jump through hoops to get to the bottom of it.
Many of the features you really want are locked to the Pro version. Of course, any developer needs to make money to continue the active support and development of a plugin.
But to see something like leverage browser caching locked off to Pro is a bit disappointing.
Rating and Final Thoughts
We’d give Comet Cache the following:
Feature set 3 / 5
User interface 2 / 5
Ease of use 3 / 5
Support 3 / 5
Pricing 3 /5
Overall 3 / 5
Wrapping Up
Comet Cache is a good all-around caching plugin for WordPress. In this Comet Cache review, we’ve explored the various options and functionality offered by Comet Cache and how to set it up.
In our opinion, there are better plugins like WP Rocket and W3 Total Cache available. However, Comet Cache is still a decent alternative.
Have you used Comet Cache at all? What did you think of the plugin? Or what’s your favorite WordPress caching plugin? Let us know in the comments below.


